Wednesday, May 21, 2014

Strawberry Jubilee: Summer-Themed Greeting Cards

I'm blowing the dust off of this old blog to bring in a few fresh projects that have been in the works lately. The arrival of the beautiful spring weather got my creative juices flowing and I like to take full advantage of this energy before the heat of summer hits. As much as I dread the heat, I enjoy the bounty of fruit that is in season. My hubby brought back some strawberries from a weekend fishing trip to east Texas, so I thought about photographing them for some summer greeting cards I wanted to make. I had recently restocked my scrapbook paper stash with some lovely new items from Close to My Heart. When I spotted the Jubilee Paper Pack, it just screamed "summer", so I knew it would be great for some summer-themed cards and craft projects. I had fun making these cards. All of a sudden, I have a massive craving for strawberries!

The completed cards:
Here are the initial photos of the strawberries. I printed the photos, leaving a white border in place. I love the contrast of red berries against blue patterned paper: 


I left some negative space at the bottom of this one so that type could be added later:


Here are the individual cards:

Tuesday, December 17, 2013

Snowflake Cake

Snowflake Cake by Art of Sweet Tea Blog
I've been hoarding this particular issue of Southern Living magazine for a year now.
SL Mag Cover Web
Inside SL Magazine Web
It's moved around my house to various spots on the coffee table, beside my computer, in the spare bedroom and onto my nightstand. The cake on the cover has been taunting me for that long. You see, I've been on the quest for the perfect white cake recipe, one like the cake I had for my wedding. It was the perfect moist, light and delicious homemade vanilla cake made by a friend of my Mom's. I have memories of my hubby and I sharing a leftover piece of it the day after our wedding while sitting at the airport waiting for our honeymoon flight. It was the best-tasting cake ever. The recipe remains top secret, but I hope to find it one day in all of my cake testing.

I was hoping this recipe would be the one. I had been putting off making this particular cake because it involved using only egg whites and beating the egg whites into meringue to fold into the batter. I don't like to waste egg parts, and usually use only recipes involving the whole egg. The only way to get a truly white cake is to avoid using the yolks, so I sacrificed 5 precious yolks in order to make this. The cake turned out to be a fluffy pure white cake with the flavor of a traditional pound cake. I'd say it's a keeper, but unfortunately, my quest for my wedding cake does not stop with this recipe. It is a very tasty cake, though, so you can click HERE for details on the article from Southern Living magazine. The recipe for Mrs. Billett's White Cake can be found at the bottom of this post.

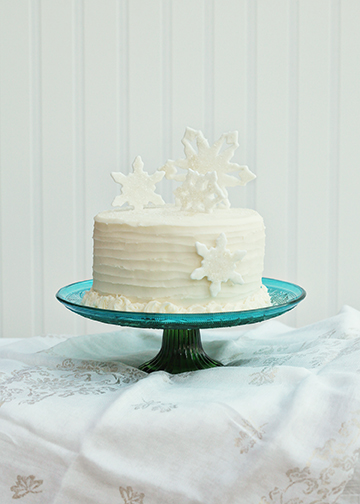
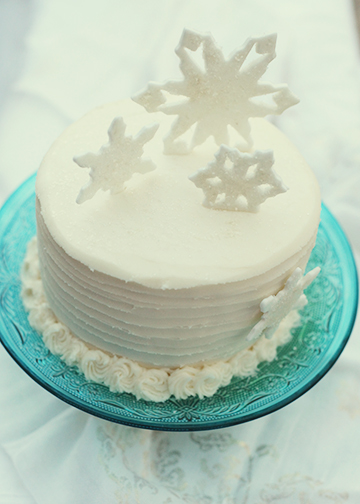
I couldn't stop with just baking a cake and frosting it. I wanted to try my hand at making the snowflakes as well. I had recently started using Wilton Fondant to make some simple flower decorations for my cakes. The pre-made fondant is really easy to use. It is basically edible play-dough, and when mixed with a pinch of Tylose powder, it dries very quickly and can be used in a variety of ways for cake decorating. I used sugar sprinkles and edible glitter to add some sparkles to my snowflakes and love how they turned out:
Snowflake Cake Top View web
Snowflake Closeup web
Mrs. Billett's White Cake as found in Southern Living Magazine:

Ingredients:
1 Cup Milk
1 1/2 teaspoons vanilla extract
1 Cup softened butter
2 Cups granulated sugar
3 Cups cake flour (I used Swans Down brand)
1 Tablespoon baking powder
5 egg whites

1. Preheat oven to 350 degrees F. I made two small two-layer 6" cakes, but you can also use three 8" round cake pans. I always line the bottom of my pans with parchment paper and spray with vegetable oil spray. If you don't have parchment paper, just grease thoroughly with butter and sprinkle lightly with flour.

2. Stir together milk and vanilla.

3. Beat softened butter with sugar until light and fluffy. Sift together flour and baking powder. Add this flour mixture alternately with the milk mixture, gradually beating into the butter/sugar mixture. Beat at low speed until well-blended.

4. Beat egg whites until stiff-peak stage. You're basically making a meringue. Gently fold this meringue into the batter to keep the cake light and fluffy. Pour batter into prepared pans.

5. Remove cake from pans. (I usually wrap the cakes in plastic wrap while warm and put into the freezer so they can cool and firm up to allow for easier handling and frosting.)

Saturday, July 13, 2013

Macarons from Afar

My family left last week for a trip to Paris. I resisted the urge to climb into their luggage and instead recommended they head straight to the pastry shops of Paris upon arrival. "Forget the Eiffel Tower or the Louvre - those can wait! You must have Macarons," I urged them. I've never been to Paris, but when I go, I intend to map out all of the famous pastry shops and visit each and every one of them. It appears that my family heeded my advice. I present to you authentic Pierre Hermé Macarons in all of their glory. They are almost too beautiful to eat, so I had to snap a few photos before sampling:
Macarons from Paris
Pierre Herme Macarons
My family must have predicted the tremendous wave of sadness that would overcome me as I finished the last of these beauties, so they brought me another keepsake from their Parisian tour:
Galignani Packaging
They visited the Galignani book store, which was founded in 1810, and is the oldest English bookstore in Europe. I unwrapped the package to find this delightful cookbook:
Macarons Book Cover
The photography in this book is beautiful and I can't wait to whip up some of these petite treats. This is the gift that keeps on giving - I will have to bring some of these to our next family gathering.

Sunday, July 7, 2013

A Perfect Summertime Meal: Vietnamese Spring Rolls

Spring Rolls from Art of Sweet Tea blog
I'm enjoying what's left of this nice 4-day Fourth of July holiday weekend. It's been a nice and relaxing holiday spent with family and friends with the requisite cook-outs, sweet iced tea and mosquito repellent. Perhaps if I didn't consume all of the sweet tea, I would not need the bug repellent. I'm a mosquito magnet, it seems. I was only outside about 5 minutes attempting to photograph a couple of items for this blog post, when I looked down and had at least 3 mosquitoes on my legs. I quickly swatted at them and managed to get a few decently sharp shots of the tasty spring rolls featured here today. These rolls make the perfect summertime meal and are a great alternative to a salad. This weekend, my sister-in-law also introduced me to a new spring roll water bowl gadget which makes the process of moistening the spring roll wrapper so much easier, so I decided to share it here today.

To make these spring rolls, you first need the rice paper wrappers:
Spring Roll Wrapper
We get ours at the local Asian market, but I've seen them in the International Food aisle of our local Kroger. These wrappers are sometimes tricky to work with and it takes a bit of practice to roll these. This little gadget makes the process of moistening the wrapper a breeze:
Rice Paper Water Bowl
Spring Roll Wrapper Water Bowl
The wrappers are stored on the side and the bowl is filled with warm water. Just grab a wrapper and dip it in the bowl of water and swirl it around until all edges are moist. Put it flat on a plate and begin adding ingredients in the middle of the wrapper. Begin rolling as if rolling a burrito or taco.
The White on Rice Couple blog has an excellent tutorial on making spring rolls. Also, Amazon carries this water bowl if you're not able to find them locally. Here's the link.

Once you have the wrapper, you're halfway there. The only other things you need are veggies and other goodies to fill it with. For our rolls, we used rice noodles, bean sprouts, shrimp, pineapple, lettuce, cucumber, shredded carrots and assorted mint leaves. The beauty of these rolls is that you can fill them with anything you want. The latest issue of Southern Living even featured these with peaches. Sounds delicious!

To complete this dish, you need the Nuoc Mam or Fish Sauce for dipping:
Nuoc Mam Fish Sauce Recipe
My sister-in-law gave me the recipe she uses, which has just the right amount of sweetness. We use the Three Crabs brand of Fish Sauce, although if you can't find it, just use whatever you're able to find.
Nuoc Mam Fish Sauce Three Crabs Brand

Nuoc Mam or Vietnamese Fish Sauce

Ingredients:
1 Clove minced garlic
4 1/2 Tablespoons sugar
1/3 Cup warm water
1 1/2 Tablespoons fresh lime juice
4 1/2 Tablespoons fish sauce
1 diced Thai chili pepper (optional)
Shredded carrots for garnish (optional)

Mix well until sugar dissolves. Divide into small bowls for dipping.

Thursday, March 28, 2013

Blueberry Tangerine Tea

 Blueberry Tangerine Tea
My globetrotting and fellow tea-loving friend just returned from Germany, but before that, she had gone to Australia and brought me some fabulous new tea to try. I mixed up a batch of the Koala brand blueberry tea and added the juice of a tangerine. The recipe is very simple, but it is a refreshing beverage and will be especially nice for the warmer days that are ahead now that it is Spring!
Koala Tea Tag
Koala Tea
The recipe is quick and easy:
Brew 4 blueberry tea bags (any blueberry flavored tea will work) in 2 cups of hot water.
Add the juice of 1 tangerine.
Sweeten to taste.
Pour over ice and enjoy!

Friday, March 22, 2013

Trio of cakes and baking secrets discovered

Blue Cake Trio

I have been doing a lot of baking and cake testing over the last couple of months. Let's just say my waist is not getting any smaller. Thank goodness for neighbors and coworkers who love baked goods! Over the course of these practice sessions, I've learned a few things, although, I still have so much to learn! Luckily, there is a wealth of information out there to help novice bakers like myself, so I thought I would share a few source links for the things that I have discovered.

In the past, I've always had problems with uneven layer cakes. The sides of the layers would not match up when stacked or there would be an uneven dome on the top of each layer, so the whole thing would look off-kilter when frosted. I would try and compensate by sawing off the dome on top and losing a lot of precious cake just trying to level it off. In some cases, it looked worse than if I'd just left things alone!

I recently discovered these Bake Even strips that helped a ton. You can find them here. You basically soak the fabric strips in water to moisten them and then velcro them around your cake pan. They help the cakes bake evenly. I've also heard that lowering the heat in the oven helps. Putting the cake pans in a water bath while baking (as you would do for a cheesecake) also yields similar results.

In my quest for a perfectly smooth cake, I searched online to see if I could find some frosting tutorials out there. I stumbled upon this one from Cup a Dee Cakes that was a huge help to me. I was mesmerized by her tutorial and how easy she made it look. She starts with a large batch of buttercream frosting and adds thin coats, chilling in between each coat of frosting. She uses a bench scraper to help get smooth edges. I put her method to the test and it worked great for me. Head on over to her blog for more great tips.

If you're looking for a fun cake with a more rustic/organic feel, head over to Sweetapolita blog for her "Swirl" method. I used the technique on this cake and I love how it turned out:
 Blue Swirls Cake

Sweetapolita's cakes are always unique and beautiful. You're sure to be inspired by her blog if you love baking as much as I do.

Happy baking!


Sunday, March 10, 2013

Feeling Crafty

I had a full weekend of crafting, so it's been a fun weekend. It started yesterday with a card-making class hosted by my friend Lindy and her Mom. We enjoyed a delicious brunch of yogurt parfaits and two yummy breakfast casseroles. Lindy and her Mom are great hostesses!

The class was taught by the awesome and amazing Karah. She had put together materials to make six cute spring-themed cards from the Close to my Heart line of paper crafting products. Here are a couple of my favorites from the class:


A cute one from the "Buzz and Bumble" paper packet:


 Love the sentiment inside:


I love these classes because the cards come together quickly. Karah does the hard part of cutting out all of the items and putting together some of the more complicated pieces. I can't imagine how long it takes her to prepare everything, because I know it takes me a while to make just one card on my own. I keep all of my craft items hidden away in a closet in the spare bedroom, so by the time I dig everything out, any crafting inspiration I may have had has left my brain! Here's a photo my hubby snapped of me at my solo crafting endeavor this afternoon. Just keeping it real, folks!


I walked away from the party yesterday with six beautiful cards and a prize! I had won the raffle for the Chantilly Birthday card kit, which I knew I would have to put to use for any future birthday cakes I make. I have seen the festive cake flag buntings and banners all over Pinterest and this kit would be great for those.

Feeling inspired, I set to work making a cake. These days, it doesn't take much of an excuse to bake a cake. What good is a cake bunting without a cake to put it on? I baked the cake and opted to keep the frosting simple - plain white cream cheese frosting and a few little stars piped on top.

After the cake was done, I headed to the craft cabinet to dig out some goodies for the banners and card I would make. I cut out some of the paper from the Close to my Heart "Chantilly" and "Dotty for You" paper kits. Instead of a bunting strung across the cake, I decided to make some little flags using bamboo skewers. Here's the finished product, along with the card I made to match.


It's someone's birthday somewhere, so can't wait to celebrate with some cake. The best part of this craft project is yet to come!